Introduction
The moon incites children's curiosity from a very young age. Although it's a space object, it's more accessible to children because of its dependability and proximity. Through this short unit, children will develop a deeper understanding of the moon.
Learning Objectives
After completing this lesson plan, students will be able to:
- Discuss basic facts about the moon
- Recognize moon phases in pictures and when viewing the moon
- Understand the origin of moon craters
- Create a model of a cratered moon
Preparation
- Print out all sheets that need to be colored or completed on paper
- Make sure you have reliable Internet access
- Gather materials for activities
- Obtain books
Lesson 1: Introduce the moon
Read at least three books about the moon. You may choose from the recommendations below or select your own.
- Papa, Please Get the Moon for Me by Eric Carle
- The Nightgown of the Sullen Moon by Nancy Willard
- So That's How the Moon Changes Shape by Allan Fowler
- The Moon Book by Gail Gibbons
- Goodnight Moon by Margaret Wise Brown
- All about the Moon by David A. Adler
Have the child order the books within the following categories by laying them out on the floor or on a table in order:
- From favorite to least favorite
- From hardest to easiest
- From most to least realistic
Have the child write or dictate a short book review of his/her favorite book. The review should include the following:
- The best thing about the book
- Who he/she would recommend the book to (boy/girl, grade/age)
- Reasons for recommendation (illustrations/story/funny/sad)
Ask the child the following questions:
- Would you like to go to the moon? Why or why not?
- If you went to the moon, who would you take with you?
- What do you think it would be like if we had two moons? How could we tell them apart?
Read the following facts about the moon and its phases. The facts are grouped in lists of five facts. Within each group, have the child rank the facts from 1 to 5 in order of most to least important to know, with 1 being most important and 5 being the least. After the facts are ranked, have the child put a star next to the facts he or she knew before reading the list.
- The moon has many names; for instance, the Romans called it Luna.
- The moon does not make its own light. It can only reflect light. We see the light reflected off of the moon from the sun.
- The moon has no atmosphere, so it doesn't have weather. There is no wind on the moon. Because of this, the footprints on the moon left by the astronauts will stay for millions of years.
- The moon is about 4.5 billion years old.
- The moon is orbiting around the earth at the speed of 2,288 miles (3,683 kilometers) per hour.
- The surface of the moon isn't flat. It has lots of craters. They were formed by meteorites hitting the moon.
- The moon also has mountains and valleys.
- The moon moves across our sky toward the east.
- The moon is 250,000 miles from earth.
- The moon takes 27 days, 7 hours, 43 minutes and 11.6 seconds to orbit the earth.
- The part of the moon we can see changes. We call these changes the phases of the moon.
- The phases of the moon are caused by its orbit around the earth.
- The first phase of the moon is called the new moon. That is when the moon isn't visible from earth.
- If you have 13 full moons in a tropical year (winter solstice to winter solstice), the extra one is called a blue moon.
- It takes the moon about 29½ days to go through all its phases. We call this a lunar month.
Lesson 2: Introduce moon craters
Explain that moon craters are different sizes. They are usually shaped like circles with the middle sunken in and the edges high. Ask why the child thinks the moon would be hit by more meteors than the earth. (The moon has no atmosphere to protect it, while the earth does.) Show pictures of craters of the moon so the child develops a feel for how many there are. You can also explore the moon at https://earth.google.com/moon.
Moon Crater Art Project
- Materials: watercolor paint, white cardstock or construction paper, paintbrush, white glue
- Cut the cardstock or construction paper into a circle as large as the paper will allow. (You may use the circle pattern on the next page of this lesson.)
- Have the child draw craters within the circle with pencil.
- Use the glue to “draw” over the lines.
- When the glue is dry (or at least mostly dry), use watercolor paint to paint the moon. Using blues, greens, and purples will imitate the idea of the blue moon.
Lesson 3: Introduce moon phases
Watch these two short videos on the phases of the moon.
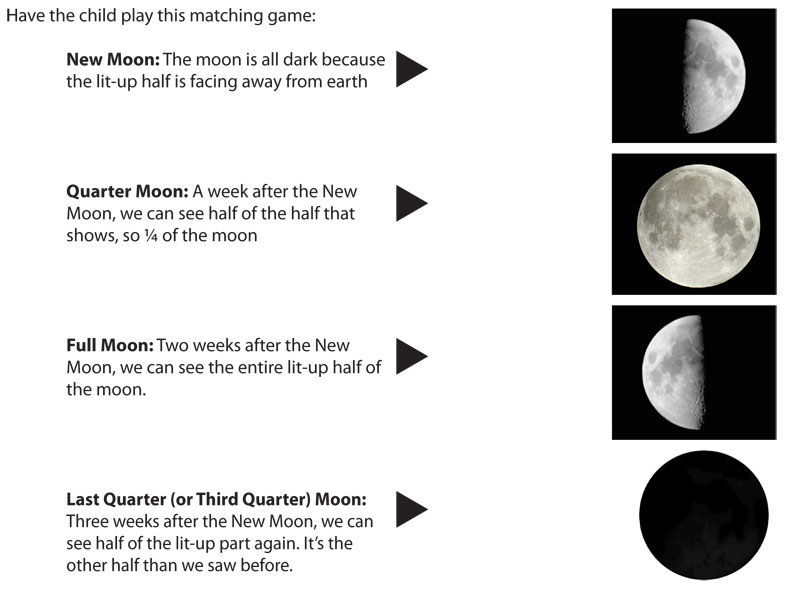
Match the name description of the moon phase to the picture. (See below.) Only four of the eight phases are on the chart. If the child is interested in all eight phases, have him or her describe the other phases and draw pictures of them. Hint: in the northern hemisphere, the waxing moon is on our right side, so the picture at right is of a waning moon and the picture at left is of a waxing moon.
Have the child find the moon phase when he/she was born.
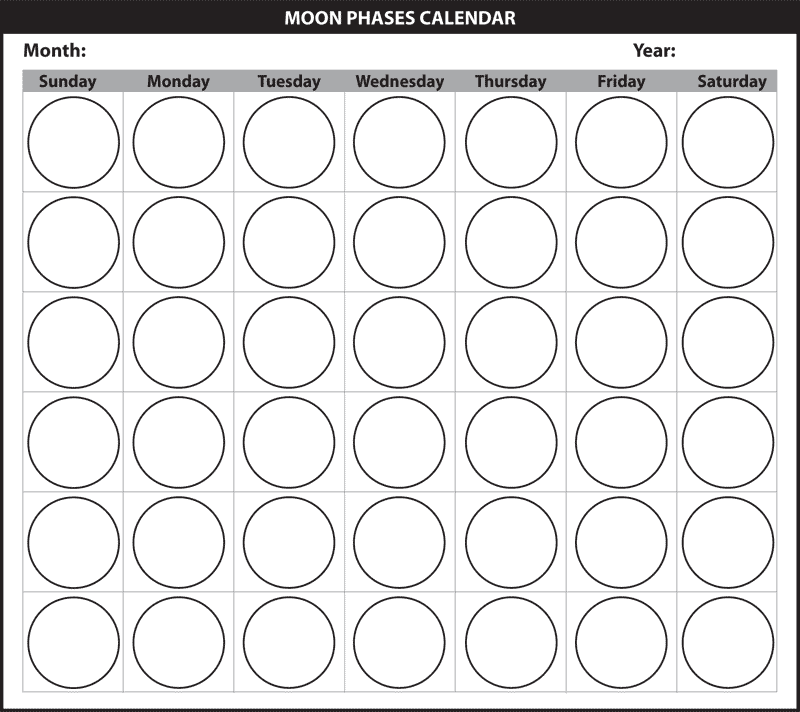
Every night for a month, have the child shade in what part of the moon he/she can see. After the month, see how many of the phases of the moon the child can identify.
Extension
Activity
Make Moon Sand:
- 6 cups of play sand (from home and garden store)
- 3 cups corn starch
- 1½ cups cold water
- Toroughly mix water and cornstarch until smooth (several minutes). Gradually mix in sand with hands, one cup at a time. Store in an airtight container. To freshen, add 2-3 tablespoons of water.
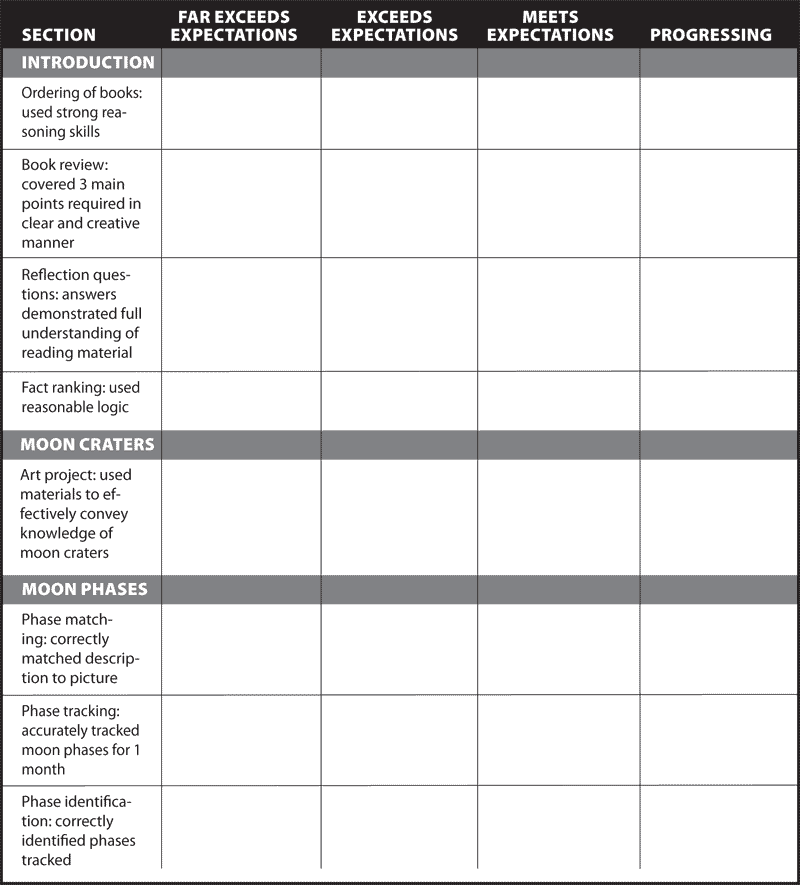
Assessment