Strong readers make the "movie" of a book in their minds. This lesson guides children through the fundamentals of format required to write an actual movie screenplay.
This lesson requires a computer and a word processing program. No other preparation or resources are required.
If you like to read and you like to watch movies, you’ve probably thought that you could write a movie yourself. Have you? Be honest! In this lesson, you’ll learn the very basics of screenwriting in a nutshell. There is much more to learn, obviously, but this will get you pointed in the right direction.
Before you go any further, the first thing you need to do is look at a real screenplay to get an idea of what they look like. Here are a few examples:
Did you notice how the formatting didn’t read like a book? Screenplays are written using a specific format. People who write screenplays professionally use specific software, and if you become serious about it, you can invest in that, too. Some commonly used screenwriting software products include:
Screenwriting software can be pretty expensive, but you don’t need it to start writing. All you need is the know-how and a story to tell. Ready?
STEP 1: The story – First, you need to choose your story. It can be a long chapter book or a shorter picture book you love. It can be a comic strip you like to read. It can be a story you made up. A good story will have strong characters and make you feel something for what’s going on. What story are you going to use?
STEP 2: The concept – Next, describe your story’s "high concept." This is the term they use in Hollywood to mean what the main idea of your story is. Put it in a "what if" format. For instance, think about the movie Mary Poppins. The "what if" statement would be "What if a nanny with magical powers came to take care of three children and changed their lives forever?" Write your "what if" statement.
STEP 3: The document – Now let’s make a title page. Open a document.
(Example at right.)
STEP 4: The document format – Now you’re ready to start your story. Before you begin, you have to format the page.
This is important to do correctly if you want to be taken seriously. However, there are many standards out there for the "right" way to format a script, usually dependent on who the script will be submitted to. For our purposes here, we’re going to aim high and use the standards used for the Academy Awards.
Here’s what you do:
Step 5: Setting the scene – Now that you’ve got your document formatted, you’re ready to write. You will write in scenes. Scenes are pieces of the whole movie. Each scene has to establish who is in the scene, where it is, when it is and what is happening. What is happening is very important. There needs to be something happening in each scene. At the end of every scene, you should be able to answer the question "So what?" with a response showing why that scene is important to the overall movie.
Step 6: The scene heading – First you need to give the scene heading. This tells where the action is taking place and what time it is, as well as other information the director and actors need to know to make it come out the way you, the writer, envision it.
Type the scene heading left aligned. Left aligned means that the letters start at the far left of the page, just like in this paragraph. Use all capital letters. First, you have to say if the scene is to be shot inside (interior, abbreviated "INT") or outside (exterior, abbreviated "EXT"). Next, put a hyphen in and give the location. Is the action taking place in a house, at an amusement park, in a library? Here are some examples:
INT. BASEMENT — MIDDLE OF THE NIGHT

	EXT. BEACH — EARLY DAWN

	EXT. MALL PARKING LOT — LATE AFTERNOON
Step 7: Adding action – You’re ready to write the action now. When we’re writing a screenplay, we use what is called the literary present tense. That means that we write as though whatever is happening in the scene is happening right now. We write in the present tense only and always. The first time you mention a character’s name, put that name all in CAPITALS. Also put anything that makes a sound in caps. That lets script readers easily see who’s there and what’s going on. Here’s an example:
INT. BASEMENT — MIDDLE OF THE NIGHT
Dim light filters through high, narrow windows. Children lie sprawled asleep on filthy mattresses on the bare floor. KAREN DIAMOND, 25, is awake, sitting on the lowest step of the wooden staircase with her face in her hands. FOOTSTEPS are heard from the floor above.
Step 8: Adding characters – Now that you’ve brought your character into the scene, you probably will want the character to speak. There are some rules for that. The character has to be introduced. You introduce the character by indenting his or her name 4.2 inches from the left edge of the paper.
Here’s what we’ve got so far:
INT. BASEMENT – MIDDLE OF THE NIGHT
Dim light filters through high, narrow windows. Children lie sprawled asleep on filthy mattresses on the bare floor. KAREN DIAMOND, 25, is awake, sitting on the lowest step of the wooden staircase with her face in her hands. FOOTSTEPS are heard from the floor above.
KAREN
Step 9: Adding dialogue – Now that she’s been introduced, the character can talk! Talking in a movie is called dialogue. Dialogue uses different margins. It should go from 3 inches from the left edge of the paper to 2.5 inches from the right edge. Example:
INT. BASEMENT – MIDDLE OF THE NIGHT
Dim light filters through high, narrow windows. Children lie sprawled asleep on filthy mattresses on the bare floor. KAREN DIAMOND, 25, is awake, sitting on the lowest step of the wooden staircase with her face in her hands. FOOTSTEPS are heard from the floor above.
KAREN
What am I going to do with all these kids? Where are we going to go? How are we going to get out of here alive?
You as the writer may have an idea of how something should be said or some action that needs to be taking place at the same time. This is called a "parenthetical" because you put it in parentheses. Parentheticals have their own margin rules. (So many margin rules!) They are indented 3.7 inches from the left and 5.2 inches from the right, for a total width of 1.5 inches. Don’t center them under the character’s name, even though that looks better. Example:
INT. BASEMENT — MIDDLE OF THE NIGHT
Dim light filters through high, narrow windows. Children lie sprawled asleep on filthy mattresses on the bare floor. KAREN DIAMOND, 25, is awake, sitting on the lowest step of the wooden staircase with her face in her hands. FOOTSTEPS are heard from the floor above.
KAREN

	(sighing)

	What am I going to do with all these kids? Where are we going to go? How are we going to get out of here alive?
You might want your character to move while he/she is talking. To do that, you put the action in, and then you have to introduce your character all over again. You use this (CONT’D) after the name to show that the dialogue continues through the action. Example:
KAREN

	(sighing)

	What am I going to do with all these kids? Where are we going to go? How are we going to get out of here alive?
Getting up from the steps, Karen walks over to one of the windows and stares out of it.
KAREN (CONT'D)

	There’s got to be a way out of here. This alley has to lead somewhere.
This shows that while she is getting up and looking out of the window, she is still talking.
Step 10: Voiceovers – Sometimes you may want your character to talk in a different way than straight dialogue. Maybe you want the action to continue while the character isn’t in the scene, but you can still hear his/her voice. This is called "voiceover" and is abbreviated "V.O." Maybe you want the character to be out of range of the camera, but still participating in the scene. This is called "off-screen" and is abbreviated "O.S."
You show this the same way as you did (CONT’D) by putting an abbreviation to the right of the character’s name. Examples:
KAREN (CONT'D)

	There’s got to be a way out of here. This alley has to lead somewhere.
The children start to stir and Karen walks around, helping them get up.
KAREN (V.O.)

	Impossible as it seemed, I knew then that our only hope lay down that dark alley.
The "V.O." shows the director and actor that the audience will hear her voice, but on the screen her lips won’t be moving.
Step 11: Keeping the beat – If you want your character to pause between sentences or phrases, type in the word "beat" like you would a regular parenthetical. Example:
KAREN (V.O.)

	I knew then that our only hope lay down that dark alley, as impossible as it seemed.

	(beat)

	And yet I knew deep down that everything to this point had also been impossible.
Step 12: The montage – You may have a scene that is like a collage of images. In screenwriting, this is called a "montage." To write the order of a montage, you start by typing "MONTAGE" in all caps left aligned. Then you number the scenes in the montage in order. You can use capital letters instead of numbers, too. It doesn’t matter. Example:
MONTAGE
1) KAREN kneels next to a small girl and gently pulls her hair back into a pony tail.
2) Karen stuffs her belongings into a ragged bag and stares around the basement, the children gathered around her.
3) Karen uses a broom handle to break the window above her, then lays a shirt across the bottom of the window sill.
4) Karen lifts the children one by one through the window.
5) When they are all out of the window, Karen looks around again, digs her toe into the crumbling wall, and boosts herself through the jagged opening, cutting her arm.
6) Empty basement with light growing brighter.
Step 13: The intercut – Another technique you might need is called "intercut." Intercutting is when you have two different scenes going on at the same time. Maybe two characters are on the phone with each other, or maybe two totally different action scenes are happening simultaneously. To do this, you establish the scene in both places, then type "INTERCUT" against the left margin. Explain the intercut in all caps, and then type the dialogue or action normally. Example:
EXT. ALLEY & MORNING
KAREN is running down the alley holding two children by the hand while the others follow.
INT. BASEMENT & MORNING
Three MEN stand in the empty basement, looking around at the mattresses and broken window, guns drawn.
INTERCUT BETWEEN KAREN WITH CHILDREN AND MEN
Karen turns off the alleyway onto a busy street and slows to a walk.
The men run up the stairs.
Karen sees a police car and heads towards it.
The men run out of the house and around the back to the alley where they find a sweater dropped by one of the children.
Karen sees the police officer and freezes in fear.
The men run down the alley, looking down cross streets.
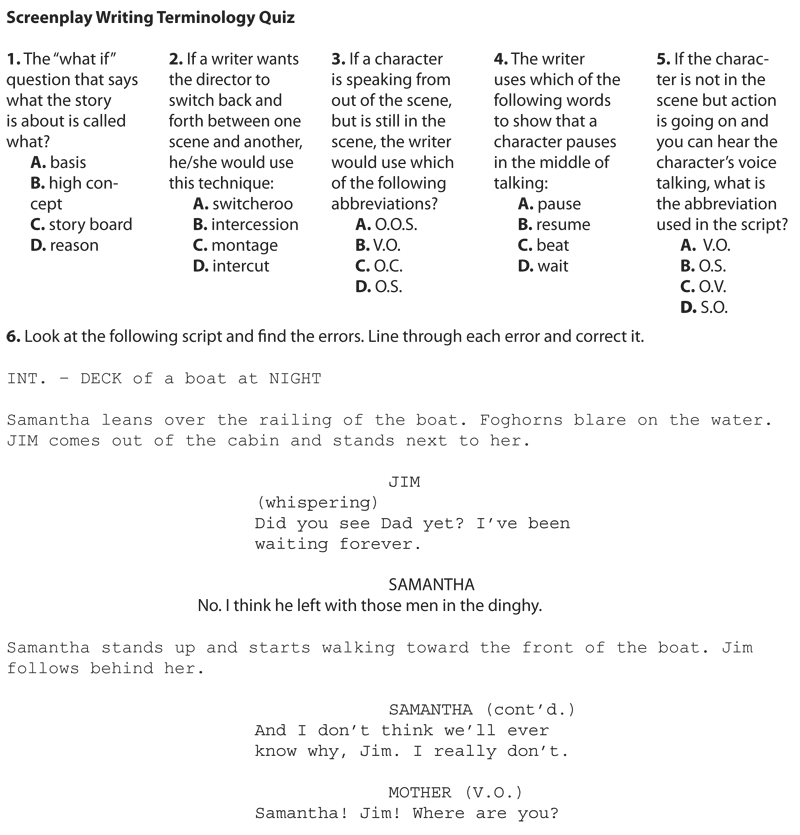
Step 14: Do it right! – It is very important that you use perfect spelling and grammar. Have someone else check it for you. Don’t rely on your computer program’s checker; it is not always accurate. Screenwriting is a serious business. If you want to be taken seriously, you can’t have misspelled words and poorly constructed sentences.
Step 15: Practice, Practice, Practice! – To practice, you need to do three things: read, watch, and write.
If you finish a screenplay, check out copyright.gov to find out how to copyright it.
Books
Etcetera

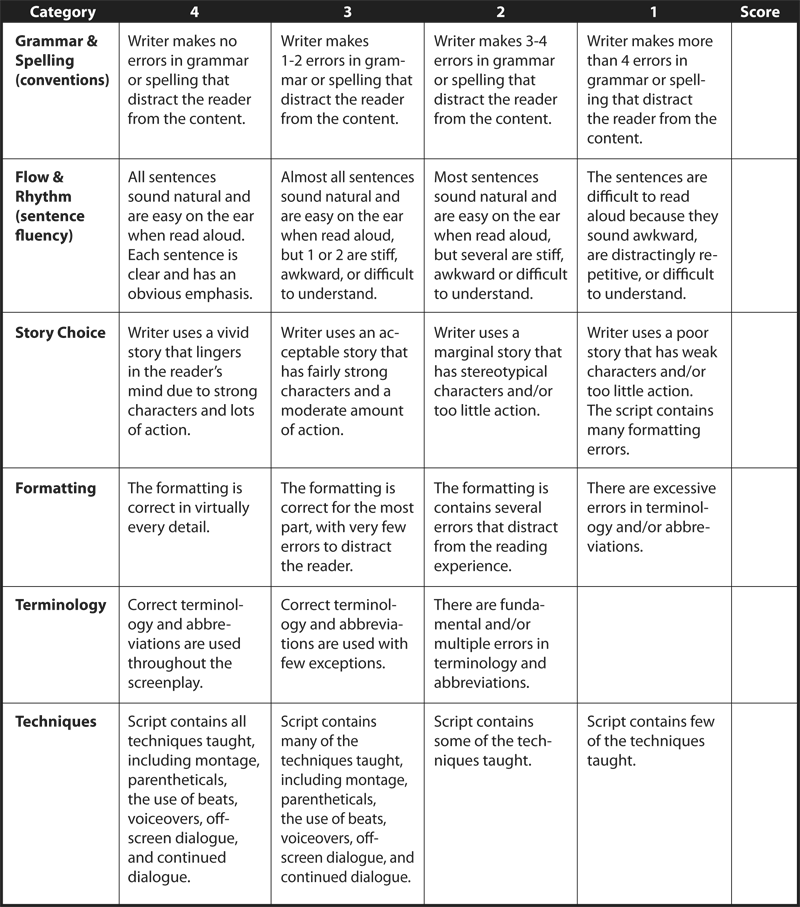
This series of lessons was designed to meet the needs of gifted children for extension beyond the standard curriculum with the greatest ease of use for the educator. The lessons may be given to the students for individual self-guided work, or they may be taught in a classroom or a home-school setting. Assessment strategies and rubrics are included at the end of each section. The rubrics often include a column for "scholar points," which are invitations for students to extend their efforts beyond that which is required, incorporating creativity or higher level technical skills.